
When building HF/VHF equipment it is often required to add a VSWR sensing circuit into the rig. Commercial bridges are often quite bulky and designed around a bulky sensor. They often require the metal box as an earth path between the input and output.
This PCB VSWR bridge may be built on a length of double-sided PCB material (or two single-side boards sandwiched). One side of the PCB is not etched and the other side contains the RF directional couplers. All components are mounted flat on the board. The whole assembly can be built with a thickness of less than 5-mm. A good indication can be obtained from 1-watt at 144-MHz and 10-watts in the HF band. I do not know the maximum safe power, but it should certainly take 100-watts or more.

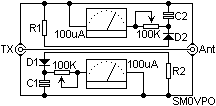
The 2x 100K pots are ganged and are not mounted on the PCB. These should be mounted on the front panel of the rig together with the forward and reflected voltage meters. The junctions of C1/D1 and C2 / D2 are the forward and reflected voltage outputs. C1 and C2 can be almost any value from 470pf to 100nf. D1 and D2 should be germanium diodes (such as OA91 etc) for best sensitivity. R1 and R2 should each be 100 ohms.
If you only need a "GO/NO-GO" indication (LED ?) then the forward voltage can be attenuated and its voltage level compared with the reflected voltage level (by an OP-AMP or similar device). This DC attenuation then controls the level at which the VSWR warning is given. You could use this to shut down or disable the transmitter if you so desire.
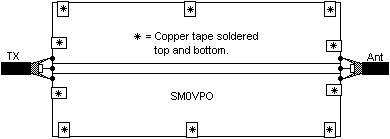
If you use RF connectors on the board then a right-angled bracket should be attached at each end of the board, ensuring it does not shortcircuit to the center conductor. Here is the side-view using sockets. BNC sockets have only been shown as an example, but you could of course use TNC, N-type, or even two-pin 13-ampere mains sockets, if you felt so inclined!

The board is 120mm x 60mm, although this is by no means critical, but the center conductor should be about 5mm wide using 1mm thick fibreglass. A foil pattern is given in my DOWNLOAD section, with a component overlay. Note that the only holes drilled in the PCB are the four mounting holes. The ground-plane of the etched side should be shorted to the un-etched side of the board, by wrapping strips of copper foil and soldering both sides. The short copper strips should be placed at both ends where the RF connections are made, each corner and one in the middle of each edge.

The sensitivity of the directional coupler is frequency dependant so it is not really suitable as a power meter, unless it is to be calibrated on a specific band using preset 100K pots. Sensitivity increases with frequency. Have fun with this simple project. Very best regards from Harry.

Dont forget to visit my messageboard if you have any questions about this or any other project. I always look forward to receiving feedback, positive or negative. You do not have to register to post messages.
Very best regards from Harry Lythall
SM0VPO (QRA = JO89WO), Märsta, Sweden.
EA/SM0VPO (QRA = IM86BS), Nerja, Spain.