
My new employment has taken all my spare time, but it has not stopped my brain from being active. A recent 700km journey to ųrnsk÷ldsvik (Eagle-shield-bay) gave me a lot of time for thought. I thought about a more permanent solution to a quick remedy for charging batteries.
This Christmas I needed a "universal charger" and so I connected two LEDs, two resistors to a knackered 24v AC Christmas tree lights transformer. The transformer itself works fine but the "special" plug did not survive more than three winters of -30║C (-22║F).
The unit can charge any battery from a single 1.2v NiCAD to a 24v battery pack. The rectified voltage is about 36v, so I get a current of about 20mA with a 26v load, and 45mA with a 1.5v cell. It just takes a couple of days to charge a 14v 4400mA/h computer battery, but it even maintained my 12v snow-plough tractor battery during the winter.
Now I have blown up my bench PSU due to too little time and rushing a job, I decided that it is high time to build another PSU but this time concentrate a bit more on current control.
I want a nice smooth current control from 0 to 500mA, but if this is the case it is difficult to set, for example, 15mA when charging Polymer cells. I also want the unit to be used as a variable voltage PSU from 0-12v DC and 0-24v DC would be a nice option.
This all means switching, and you know as well as I that switches can become dirty. I do NOT want a dicky switch to allow the PSU voltage to go winging up - I would rather a dicky switch would reduce the voltage or the current output instead of burning the current project on the bench.
With these thoughts in mind I drove 700km to ųrnsk÷ldsvik and developed the circuit in my mind. On the return journey I tested it, found a few faults and even gave a few thoughts to PCB layout, all in my mind. Here is the result.
The circuit is divided into two separate parts:
There are three options for the transformer and rectifier, which gives you a wide choice of transformer options. All you need is about 33v DC from the rectifier. You can use a simple 24v secondary transformer, but a 12-0-12v is exactly the same. The second option uses a single 12v winding, but a 6-0-6v winding will do the same job. The third option uses a 24-0-24v secondary.
The 4700uf electrolytic capacitors must be rated at 40vDC minimum, as must the capacitors in the voltage doubler circuit.
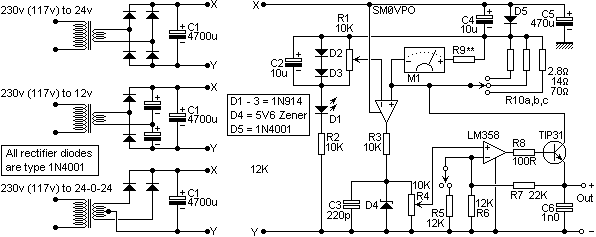
The second (lower) half of the LM358 OpAmp is a conventional voltage regulator and voltage multiplier. This uses D4 as a reference, which is a 5.6v Zener diode having a 0v/║C temperature coefficient. R7 and R6 program the OpAmp to multiply the voltage by 2.8. R4 will therefore vary the output voltage from 0v to 15v. The second voltage range is made by paralleling R6 with R5, which programs the OpAmp to multiply the reference voltage by 4.66. This range allows the output voltage to vary from 0v to 25v.
In the event the voltage range switch becomes open circuit, due to dust or something, then the voltage regulator will default to the lower voltage range, thus satisfying one of my "knackered switch" criteria.
The voltage regulator OpAmp drives the TIP31 (or TIP41), which is mounted directly on a computer processor heatsink. The heatsink is insulated from any other part of the circuit, so no mica washer is needed.
All current drawn by the TIP31 passes through M1 and R9. This is in effect a voltmeter, calibrated to 1.4v FSD. The scale is marked 0-20mA, 0-100mA and 0-500mA. The resistors R10a, b and c shunt the meter and drop 1.4v for the respective max current limit.
The diode D5 (1N4001) ensures that the voltage drop at the top of R10 is always 0.7v below the supply rail. I do not like running any OpAmp close to the supply limits, especially when I want a smooth and stable current range.
The voltage drop across R10 is compared with the voltage across D2, D3, divided by R1. D1 does the same job as D5. As long as the voltage dropped by R10 is less than the voltage selected by R1 then the output of the upper OpAmp will remain high. This in turn will ensure that the voltage comparator diode is passing current through R3. In this way the resistor R1 controls the maximum current the transistor TIP31 can draw.
In the event the voltage drop across R10 is more than the voltage drop selected at R1, then the output of the OpAmp will fall, thus lowering the voltage to R3, which starves the zener of voltage. In this event the output voltage of the regulator will fall until the current falls to an acceptable level.
C3 and C6 may appear to be small in value, but the current regulator is a closed loop with negative feedback. The last thing we want is a time-constant delay or we could create a phase-shift oscillator.
Should the current selector switch become open-circuit then the output current of the regulator will be restricted to just a few micro-amperes, thus satisfying another one of my "knackered switch" criteria.
No calibration should be necessary since an output voltage meter (not shown) and current meter are included in the instrument.
The maximum voltage ranges will be 0-15.8v and 0-26v with the values chosen, which can be regarded as a 15v and 25v ranges. R4 and R5 can be adjusted with parallel resistors (e.g. 560 to 820K) if you want to get it exact. Remember that resistor tolerance makes a mockery of calculating exact-to-three-decimal-places accurace, especially when sitting behind the wheel of a diesel van.
In a similar manner the three R10 resistors can be selected for the exact maximum current. Note that a 20mA range was my choice. You may want a 50mA range, for example. It is just to calculate the resistors according to the formula:
where
R is in Ohms
I is in amperes
R9 is chosen for the meter movement you use. I would suggest a 1mA FSD meter. The exact resistor value is equal to:
where
R is the series resistor, in Ohms
Ia is the FSD current o f the meter, in amperes
Ra is the internal resistance of the meter
You can usually remove the meter scale plate and scan it. Using Photoshop you can arrange the scale to suit your own requirements. When you have re-drawn the scale, print it out, cut it out and use PRIT to glue it to the backside of the original scale and refit the scale backwards. That way you get a meter with a nice professional-looking scale.
Use it just like any other bench power supply. The only difference is that the maximum current is 500mA and the current limiting is more controlable.
To charge a battery, short-circuit the output terminals and adjust the output current range and setting to that you desire. Now remove the short and set the output voltage according to the voltmeter.
If, for example, you wanted to charge a 12v 5A/H lead-acid accumulator, then you could use the 500mA range and set it to max voltage for 12 hours. This would give the battery a calibrated 5A/H charge. This is normal for all batteries and cells.
For lead-acid, VRLA batteries, you can alternatively set the supply voltage of the unit to 14v-DC and leave it on permanently. When the battery terminal voltage reaches 14v the charge current will fall.
You could set the charger to 15mA and leave it on 24 hours a day,7 days a week, year-in, year-out. The battery will always be fully charged and you will always have light in the garden shed.
Polymer cells, however, do not like overcharging. You can set the voltage to 3.9v DC per cell if there is a risk you could forget to switch off the charger. If you are sure not to forget it then set the voltage to 4.0v DC per cell and charge for 10% of the capacity for 12 hours. For example, a 220mA/h cell will need to be charged for 12 hours at 22mA (or 14 hours at 20mA).
A 60A/H car battery can be charged ok, but it just takes longer. Set the voltage to 14v DC and 500mA. The battery will be charged in six days, but you will get sufficient charge to start your car if left overnight. If you want it to be charged permanently 24/7/52 (e.g. all year round in your tractor) then use 1.5x the battery capacity expressed in mA - a 60A/H battery would be charged at 60 x 1.6mA = 90mA.
Now I will take the time to put this little circuit into practice and post the photographs. If you want to beat me to it then perhaps we can compare notes? Just one small point, if there is a tendence to oscillation then a capcitor between + and - input of the OpAmps will damp HF oscillation, and a resistor will damp LF oscillation - if necessary.