
I have recently found myself short of time and becoming quite forgetful. I have so many balls in the air that it is quite easy to forget things. Ok, I am over 55 years old, so you can excuse occasional shoes in the cleaning cupboard, or the telephone in the refrigerator. But it can get a bit expensive if you leave batteries on charge 24-hours a day, 7 days a week. I have just lost a pack of 8x AAA NiMH batteries that have been cooked for a couple of days.
I had thought about using a simple plug-in $5 timer, but a 1500mA/H AA battery pack, at 150mA, needs about 18 hours. This means the battery will only rest for 6 hours, then the 24-hour timer starts all over again. What I have done here is make a modification to that timer so it switches off the charger, and itself. In other words, it switches of its own clock.
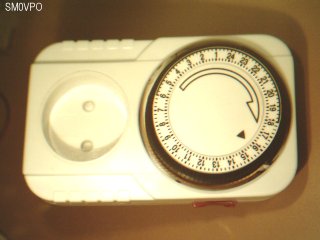
This is the cheap'n nasty timer I used.
Your timer will almost certainly differ from mine, but they are all rather similar in construction. There is a synchronus motor connected to the input, and a micro-switch connects the input terminals to the output. What you have to do is to disconnect the clock motor from the input, and connect it to the output.
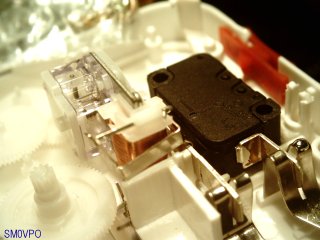
Gently remove the screws at the rear and lift away the top shell. Lift away the output socket shutter. Prise open the little plastic split-posts that secure the timer rotor to the gear train. Do this gently so the nylon gears beneath it do not fall out of place. It should look something like this:

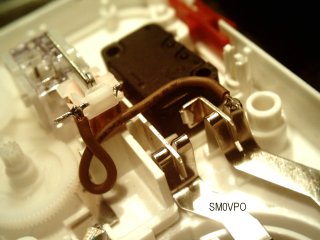
In the picture below you can see a bit of metal in front of the coil. This is the contact between the power input bar and one side of the coil. These things are not soldered, maybe spot-welded, but mine was even cheaper - just a press-fit. I just bent the contact fork from the coil and lifted the whole bit of metal out.
The next step is to connect the coil to the other side of the micro-switch. That's the dark thing in the top of the case. The 60K resistor at the bottom is the return from the coil to the other power terminal. This power terminal is connected from input to output directly.
Fit a bit of wire to connect the output terminal to the motor coil. Use insulated wire, and be careful where you route it. There will be tabs in the top cover to hold the metal bus-bars in place, so do not use too much solder. Inspect it well so that you solder somewhere that is convenient and will not prevent you putting it all back together.
Now it has all been modified, just re-fit the timer rotor. Make sure that the nylon cogs are all aligned and sit in their guides. The last one fits through a hole so that it turns the timer rotor. If there is an over-ride switch, use it to jam the switch-lever and hold it in position when you refit the rotor.
When the rotor is correctly fitted you can rotate it by hand, and hear that awfull schoolgirl-fingers-on-the-blackboard noise that tels you it is all positioned correctly.
The split posts should click back into position. All you need to do is to re-fit the upper shell and test it out.
Drop down sufficient 15-minute timer tabs IN A CONTINUOUS ROW for the charge length - eg. 00:00 (or 24:00) to 18:00 for an 18-hour charge. Rotate the rotor until the charger just switches ON. When the 18-hour cycle ends the timer will turn off the charger as well as cutting it's own throat. It will never switch ON again until you start it manually.
This is only a simple 20-minute operation, but it could save many $$$ on damaged batteries. Even that Philips razor can have it's 2-hour charge, without being left on all night. Now I should be able to my charge batteries once, and once only, no-matter how bad my memory is. I hope that this little trick can help you, too. Very best regards from Harry - SM0VPO
Now where did I leave my wire cutters? I had them when I loaded the dish-washer. Oh SHIIIIIIiiiii!!!!